简要介绍如何在基于Flask开发的程序中通过Nacos提供的nacos-sdk-python实现在Python程序中整合Nacos。
完整代码在python-nacos-demo
注册Nacos
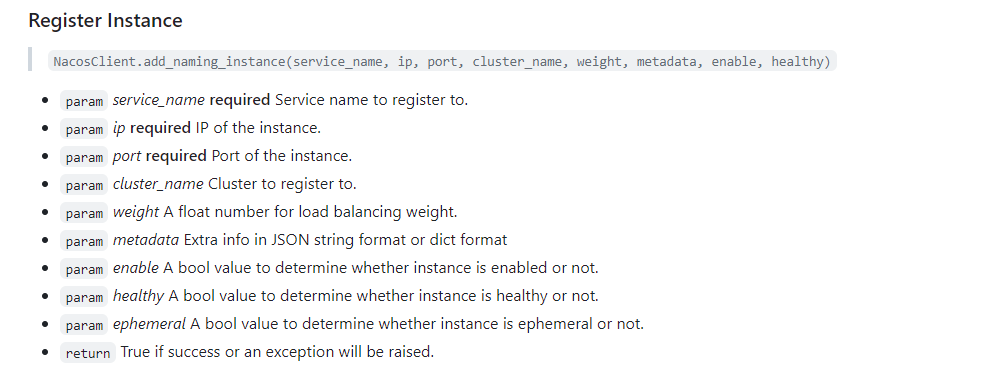
官网文档的说明如下

从中可看出只有service_name、ip与port 是必填项,而我们在实际使用中经常需要通过group进行区分,上述文档中并没有相关说明,翻看其源码发现add_naming_instance的方法签名如下,其中包含group相关信息,文档没有与源码保持一致,必须吐槽下Nacos官方!
1
2
|
def add_naming_instance(self, service_name, ip, port, cluster_name=None, weight=1.0, metadata=None,
                        enable=True, healthy=True, ephemeral=True,group_name=DEFAULT_GROUP_NAME):
|
同时可发现要注册实例,必须先获得一个NacosClient对象之后才能进行对应操作,基于官方文档的实现如下:
1
2
|
client = nacos.NacosClient(server_address, namespace=namespace)
client.add_naming_instance(service_name, service_address, port, group_name=group_name)
|
由于对Nacos的各种操作都涉及到NacosClient,故可将其定义为一个全局变量,后续在其它地方可直接使用
1
2
3
|
global NACOS_CLIENT
NACOS_CLIENT = nacos.NacosClient(server_address, namespace=namespace)
NACOS_CLIENT.add_naming_instance(service_name, service_address, port, group_name=group_name)
|
程序启动后监听
安装完成后可在Nacos页面的服务菜单中看见对应的实例,但经过十几秒后该实例会显示为如下图所示的不健康状态,之后会自动从Nacos服务列表中移除掉:

造成此现象的原因为nacos-sdk-python没有提供自动发送心跳的机制,需要自己实现代码来持续不断地发送心跳请求以维持健康状态,可通过异步线程的方式实现,相关代码如下:
 1
 2
 3
 4
 5
 6
 7
 8
 9
10
11
12
13
14
15
16
17
18
19
20
21
22
23
24
25
26
27
28
29
30
31
32
33
34
35
36
37
38
39
|
NACOS_SERVER = None
NACOS_SERVICE = None
NACOS_CLIENT = None

logger = log.get_logger(__name__)


def register_nacos(yml_data):
    # 服务器配置
    port = yml_data['nacos']['server_port']
    server_address = yml_data['nacos']['server_address']
    global NACOS_SERVER
    NACOS_SERVER = NacosServer(port, server_address)

    # 调用方配置
    namespace = yml_data['nacos']['namespace']
    service_address = yml_data['nacos']['service_address']
    service_port = yml_data['nacos']['service_port']
    service_name = yml_data['nacos']['service_name']
    group_name = yml_data['nacos']['group_name']

    global NACOS_SERVICE
    NACOS_SERVICE = NacosService(namespace, group_name, service_name, service_address, service_port)

    global NACOS_CLIENT
    NACOS_CLIENT = nacos.NacosClient(server_address, namespace=namespace)
    NACOS_CLIENT.add_naming_instance(service_name, service_address, service_port, group_name=group_name)
    logger.info("=========register nacos success===========")

    thread = threading.Thread(target=send_heartbeat, name="send_heartbeat_threads",
                              args=(NACOS_CLIENT, service_name, service_address, service_port, group_name),
                              daemon=True)
    thread.start()


def send_heartbeat(client, service_name, ip, port, group_name):
    while True:
        client.send_heartbeat(service_name, ip, port, group_name=group_name)
        time.sleep(5)
|
读取配置
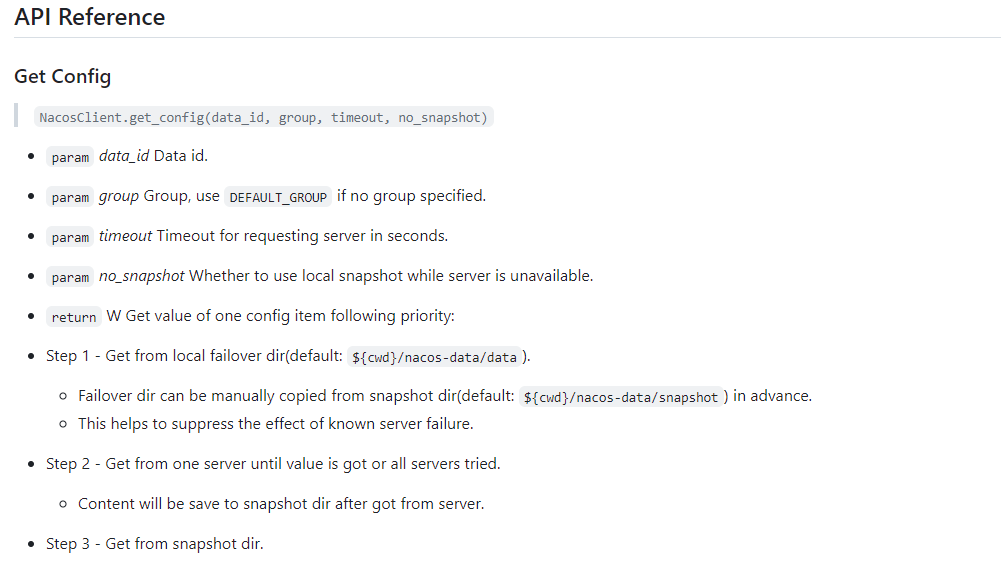
在Java中通过引入spring-cloud-starter-alibaba-nacos-discovery依赖可直接解析相关的配置文件,非常方便,而在Python中相对没这么简洁,其使用方法如下

使用代码类似如下
1
|
config = NACOS_CLIENT.get_config(data_id, group, no_snapshot=True)
|
其返回值是一个dictionary对象,获取之后可根据实际情况做进一步处理
日志系统启用
在How do I obtain logs from a Nacos client中有如下信息说明Nacos中的日志与logging模块保持一致,只需要通过logging开启日志即可。
A Python Nacos client uses the logging module of Python, which is consistent with the logging module of your application. Logs of a Python Nacos client are displayed in application logs.
可在app.py程序的头部添加类似如下代码即可开启Nacos日志
1
2
|
logger = logging.getLogger(name)
logger.setLevel(logging.INFO)
|
开启后显示效果类似如下

调用其它程序
在Spring中可通过OpenFeign或Dubbo来调用注册到Nacos中的服务接口,由于Python与Java是两套不同的体系,在Python只能通过Requests模块直接发送对应的HTTP请求实现,类似如下代码:
1
2
3
|
url = 'http://127.0.0.1:8081/user/queryAll'
response = requests.get(url).text
print(response)
|
在上述代码中,url地址中的ip和port以硬编码的形式指定,实际使用环境的ip和port会动态变化,显然此种方式使用起来不灵活。结合Nacos本身的特性,可先通过服务名称获取对应的服务实例信息,则其中解析出ip和port,之后发送请求,从而消除动态配置。
获取实例
获取实例的方法说明如下

相关调用代码类似如下:
1
2
3
|
namespace = NACOS_SERVICE.namespace
group_name = NACOS_SERVICE.group_name
instances = NACOS_CLIENT.list_naming_instance(service_name, namespace_id=namespace,group_name=group_name,healthy_only=True)
|
执行后的结果类似如下,可通过在hosts中找到对应的ip和port为调用做准备

调用接口
获取到ip和port之后,接下来就是正常的发送HTTP请求,此时已经和Nacos没有关系
1
2
3
4
5
6
|
instances = get_instance(service)
ip = instances['hosts'][0]['ip']
port = instances['hosts'][0]['port']
url = "http://" + ip + ":" + str(port) + "/" + method
response = requests.get(url).text
print(response)
|


