由于工作原因需要在阿里云中部署一个Web系统,该系统会调用邮箱服务器定时给相关人员发送通知邮件,在测试邮箱配置时,发现始终无法正确发送邮件,而之前在研发环境和测试环境都能正常工作。网上查找之后,发现是阿里云出于安全原因默认禁止了25端口的出方向访问,需要进行25端口解封申请,按照说明提交相应的申请后没想到不到一个小时就提醒申请未通过,同时提示使用465端口来发送加密邮件。基于此,本文简要说明如何使用126邮箱通过465端口在阿里云中发送邮件。
邮箱配置
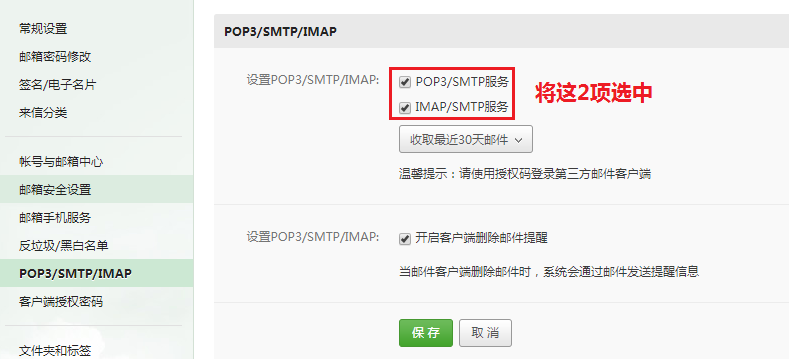
首先找到一个可用的126邮箱,进入邮箱设置选项,开启SMTP服务,如下图所示
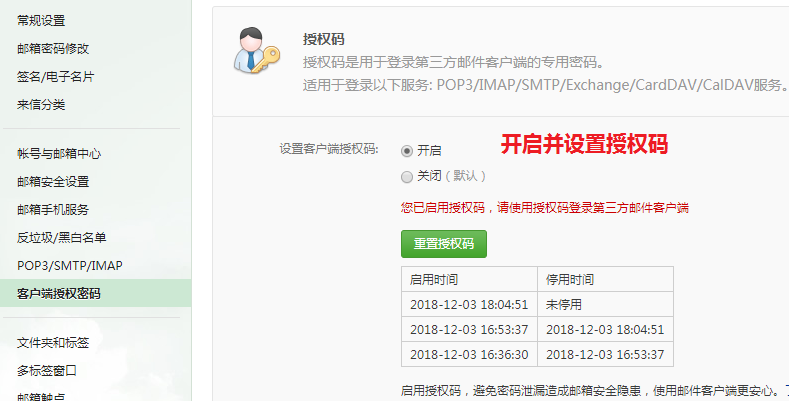
 对于某些类型的邮箱完成上一步的操作后即可通过邮箱和密码发送邮件,但对于126邮箱还需要在“客户端授权密码”中设置相应的授权码。授权码的作用和邮箱密码类似,但授权码主要是供第三方客户端调用时使用,这样可达到即可让第三方软件调用,也不泄露自己邮箱密码的目的。

代码编写
下述代码为使用25端口发送邮件的Java代码,其实现基于Java Mail 1.4.1。
 1
 2
 3
 4
 5
 6
 7
 8
 9
10
11
12
13
14
15
16
17
18
19
20
21
22
23
24
25
26
27
28
29
30
31
32
33
34
35
|
public void testSendMail() {

	final String sendUserName = "***@126.com";
	final String sendUserPassword = "***";

	// 收件箱
	String receiveUser = "recevie@mail.com";

	Properties props = new Properties();
	props.put("mail.smtp.auth", "true");
	props.put("mail.smtp.host", "smtp.126.com");
	props.put("mail.smtp.port", "25");

	Session session = Session.getDefaultInstance(props,new Authenticator() {
		@Override
		protected PasswordAuthentication getPasswordAuthentication() {
			return new PasswordAuthentication(sendUserName, sendUserPassword);
		}
	});

	try {

		Message message = new MimeMessage(session);
		message.setFrom(new InternetAddress(sendUserName));
		message.setRecipients(Message.RecipientType.TO, InternetAddress.parse(receiveUser));
		message.setSubject("Test Mail Send");
		message.setText("Hello World!");

		Transport.send(message);
		System.out.println("Send mail success");

	} catch (MessagingException e) {
		e.printStackTrace();
	}
}
|
为了使用465端口发送邮件,除了在代码中修改端口之外,还需要将Mail Socket指定为SSL实现,实际使用中我发现通过props.put("mail.smtp.socketFactory.class", "javax.net.ssl.SSLSocketFactory");即可实现,完整的代码如下
 1
 2
 3
 4
 5
 6
 7
 8
 9
10
11
12
13
14
15
16
17
18
19
20
21
22
23
24
25
26
27
28
29
30
31
32
33
34
35
36
37
38
|
public void testSendMail() {

	final String sendUserName = "***@126.com";
	final String sendUserPassword = "***";

	// 收件箱
	String receiveUser = "recevie@mail.com";

	Properties props = new Properties();
	props.put("mail.smtp.auth", "true");
	props.put("mail.smtp.host", "smtp.126.com");
	props.put("mail.smtp.port", "465");

	//指定使用基于SSL的套接字
	props.put("mail.smtp.socketFactory.class", "javax.net.ssl.SSLSocketFactory");

	Session session = Session.getDefaultInstance(props,new Authenticator() {
		@Override
		protected PasswordAuthentication getPasswordAuthentication() {
			return new PasswordAuthentication(sendUserName, sendUserPassword);
		}
	});

	try {

		Message message = new MimeMessage(session);
		message.setFrom(new InternetAddress(sendUserName));
		message.setRecipients(Message.RecipientType.TO, InternetAddress.parse(receiveUser));
		message.setSubject("Test Mail Send");
		message.setText("Hello World!");

		Transport.send(message);
		System.out.println("Send mail success");

	} catch (MessagingException e) {
		e.printStackTrace();
	}
}
|
其他说明
Java Mail中关于邮件设置的选项请参见com.sun.mail.smtp,实际使用时我发现只需要添加props.put("mail.smtp.socketFactory.class", "javax.net.ssl.SSLSocketFactory");即可,额外的添加其它一些配置反而可能会导致不能正常使用。
如当参照Stackoverflow中的Using JavaMail with TLS这个问题的答案加上如下代码:
1
2
3
|
props.put("mail.smtp.starttls.enable","true");
props.put("mail.smtp.auth", "true");
props.put("mail.smtp.socketFactory.fallback", "false");
|
程序运行的结果如下

此时只需将props.put("mail.smtp.starttls.enable","true");这行代码去掉或将其值设置为false即可正常发送邮件。
参考说明:
 对于某些类型的邮箱完成上一步的操作后即可通过邮箱和密码发送邮件,但对于126邮箱还需要在“客户端授权密码”中设置相应的授权码。授权码的作用和邮箱密码类似,但授权码主要是供第三方客户端调用时使用,这样可达到即可让第三方软件调用,也不泄露自己邮箱密码的目的。


