简要记录如何整合Jenkins与SSH免密登录,实现通过Jenkins流水线部署到不同的服务器环境下,提高开发与测试环境的灵活性。
背景
在KubeSphere中通过Jenkins流水线部署时,可选择部署到KubeSphere原生支持的Kubernetes中或部署到Docker容器中,从流水线配置的角度而言,除了最后一个阶段部署环境的不同,其它阶段都是类似的。
部署到Kubernetes:
start_build=>start: 开始构建
clone_code=>operation: 下载代码 |request
compile_code=>operation: 编译代码 |request
build_image=>operation: 镜像编译 |request
upload_image=>operation: 镜像上传 |request
deploy_image_in_k8s=>operation: K8S中部署镜像 |invalid
end_build=>end: 构建完成
start_build(right)->compile_code(right)->build_image(right)->upload_image(right)->deploy_image_in_k8s(right)->end_build
部署到Docker:
start_build=>start: 开始构建
clone_code=>operation: 下载代码 |request
compile_code=>operation: 编译代码 |request
build_image=>operation: 镜像编译 |request
upload_image=>operation: 镜像上传 |request
deploy_image_in_docker=>operation: Docker中部署镜像 |rejected
end_build=>end: 构建完成
start_build(right)->compile_code(right)->build_image(right)->upload_image(right)->deploy_image_in_docker(right)->end_build
两种部署方式对比如下:
|
部署到Kubernetes |
部署到Docker |
备注 |
| 环境配置难易 |
复杂 |
简单 |
K8S集群配置和验证较为复杂
Docker的安装较为简单 |
| 流水线配置 |
低 |
高 |
在Docker环境下需要为每个服务器配置ssh认证 |
| 使用便利性 |
高 |
中 |
K8S能与KubeSphere无缝整合,日志查看与操作更方便
Docker环境下只是依赖KubeSphere做可视化部署 |
| 可迁移性 |
高 |
中 |
每新增一个Docker环境都需要重新配置对应的ssh认证 |
| 可扩展性 |
低 |
中 |
K8S需要添加集群节点
Docker需要配置ssh认证 |
目前大部分项目都是直接部署到Kubernetes而部分项目由于环境以及运维等特殊考量采用的是直接部署到Docker,由于此种方式下配置流水线较为复杂,本文将相关操作过程简单记录下,供后续参考。
SSH远程执行
理论基础
部署到Docker的理论基础是通过Jenkins所在的宿主机(目前部门内部的Jenkins与KubeSphere都在同一台宿主机上)通过SSH(Secure Shell)在要部署的服务器上执行Docker相关执行,将之前需要手工执行的操作步骤以自动化的方式替代。
关于SSH远程执行的相关操作说明,详情请参见 SSH远程执行任务 ,常用的指令如下
 1
 2
 3
 4
 5
 6
 7
 8
 9
10
11
|
# 执行单条指令
ssh nick@xxx.xxx.xxx.xxx "df -h"

# 执行多条指令
ssh nick@xxx.xxx.xxx.xxx "pwd; cat hello.txt"

# 远程执行脚本,不带参数
ssh nick@xxx.xxx.xxx.xxx < test.sh

# 远程执行脚本,带参数
ssh nick@xxx.xxx.xxx.xxx 'bash -s' < test.sh helloworld # helloworld即为传入的参数
|
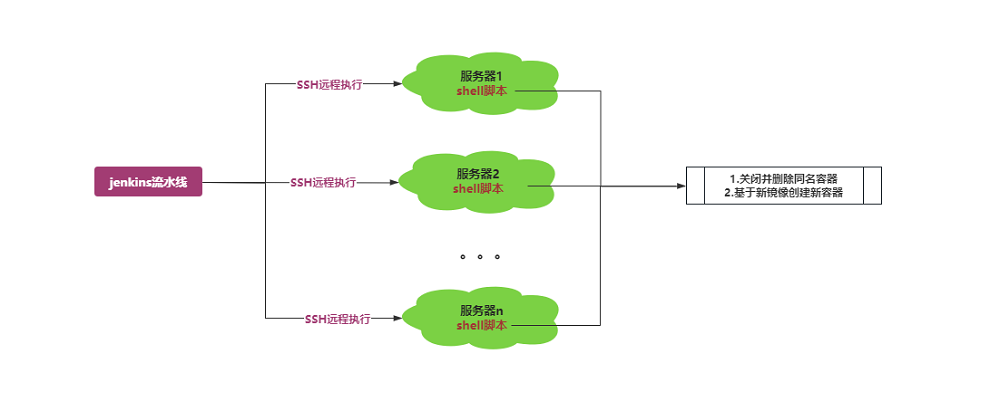
考虑到基于Docker部署时需要先检测同名的Docker容器是否存在,如存在要将其先该容器停止并删除,之后再创建新的同名容器,这一系列操作直接用指令写很复杂也不便于阅读,用shell脚本替代较为合适。
同时考虑到要兼容多个不同的工程和版本,需要传递相关的参数进行区分,故最终采用的方案为以带参数的放方式执行远程脚本。
初略的架构图如下:
实际演示
假设现在有10.30.31.22和10.30.31.24这两台虚拟机,简单演示下在10.30.31.22中通过ssh远程访问10.30.31.24
-
远程执行指令

-
远程执行shell脚本

免密登录
从上述运行效果图可看出每次执行ssh指令时都需要对应远程服务器的密码,这是一种交互式的操作,而如果我们通过Jenkins进行操作时,若要每次都输入对应远程服务器的密码,显然是不显示的,故需要进行免密登录的配置。
如何给ssh设置免费登录,详情参见 SSH远程免密登录,由于我们实际使用过程中是基于Jenkins调用ssh进行远程登录的,故不需要执行此部操作,只需要在Jenkins中设置免密登录即可。
Jenkins相关配置
此部分操作需要使用Jenkins管理员的登录,其用户名通常为admin。
Jenkins插件安装
此过程只需操作一次,之前已经安装完毕,此处记录只作为参考。
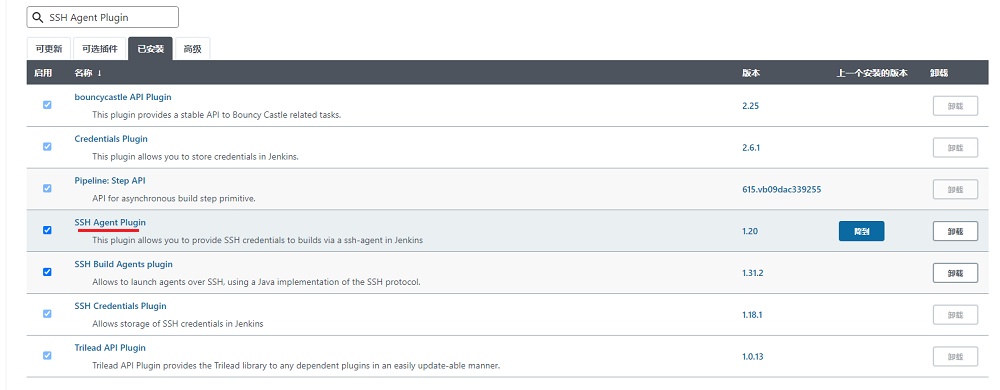
Jenkins需要安装SSH Agent Plugin来执行ssh指令,相关操作如下:
-
去Jenkins官网根据当前Jenkins的版本去下载对应版本的插件,插件的扩展名为hpi
-
以管理员账户登录Jenkins,依次点击系统管理->插件管理->高级,在出现的界面中找到如下图所示的上传插件界面,选择对应的hpi文件并点击上传按钮上传对应插件,若对应文件的版本不兼容,会提示相应错徐消息

-
若能正常上传,在系统管理->插件管理->已安装中列表中会出现刚才安装成功的插件信息,通过输入SSH Agent Plugin可缩小范围查询,至此整个插件安装完成。
Jenkins配置
每增加一个远程服务器时,都需要仿照下述说明在Jenkins中添加相关的配置。
生成公钥与私钥
-
在要执行的服务器上执行下述指令,检测ssh目录是否存在
1
2
|
ls ~/.ssh/
# 如果该目录提示不存在,需要先ssh localhost用root用户登录一下ssh
|
-
以root账户或其它具有权限的账户在终端中执行下述指令来生成秘钥
1
2
|
# 邮箱名称可根据实际情况填写
ssh-keygen -t rsa -b 4096 -C "xxx@xxx.com"
|
执行过程中一路按Enter键即可,执行结果类似如下 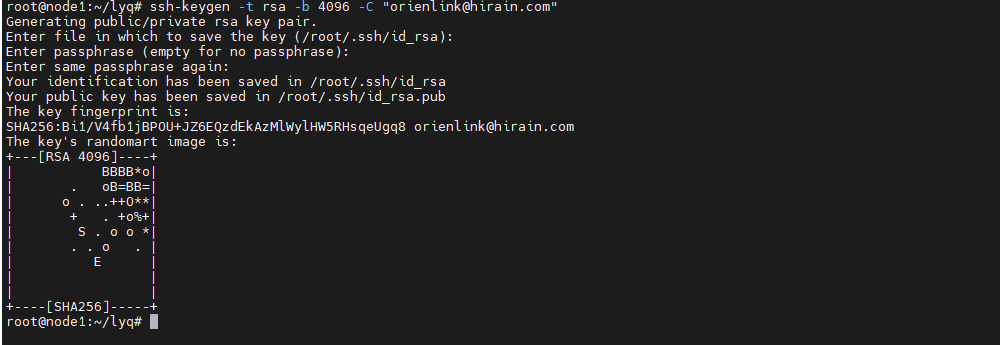
-
执行下述指令,将公钥写入到authorized_keys文件中(若缺少此步骤会导致Jenkins进行免密登录时一直认证不通过)
1
2
|
cd ~/.ssh
cat id_rsa.pub >> authorized_keys
|
执行结果输出类似如下,至此公钥与私钥配置完毕。

Jenkins配置凭据
此文参考于Jenkinsfile 中配置使用 ssh agent 连接远程主机,可在该文章中查看详细的说明。
-
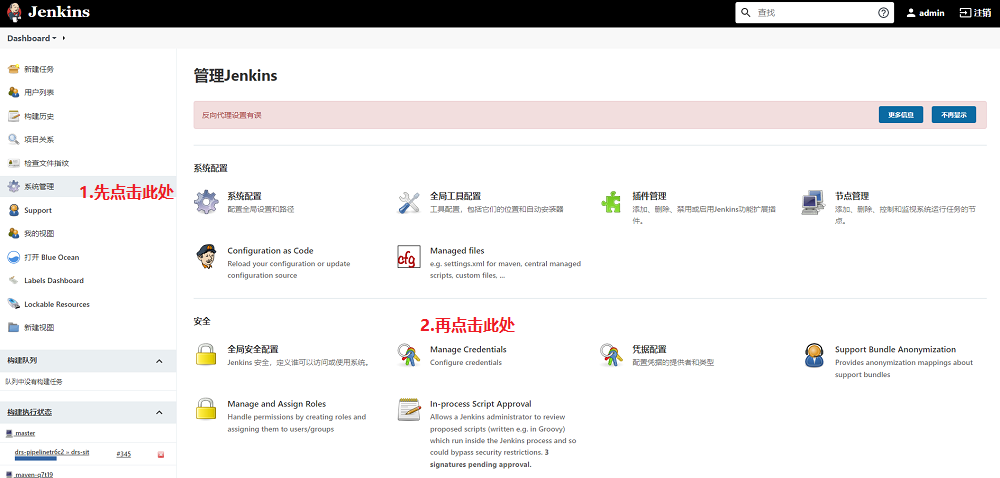
以admin等具有管理员权限的账号登录Jenkins,仿照下图所示,依次点击系统管理->Manage Credentials会出现对应的凭据列表
-
在出现的凭据列表中,点击任一个凭据的全局链接,进入全局凭据列表
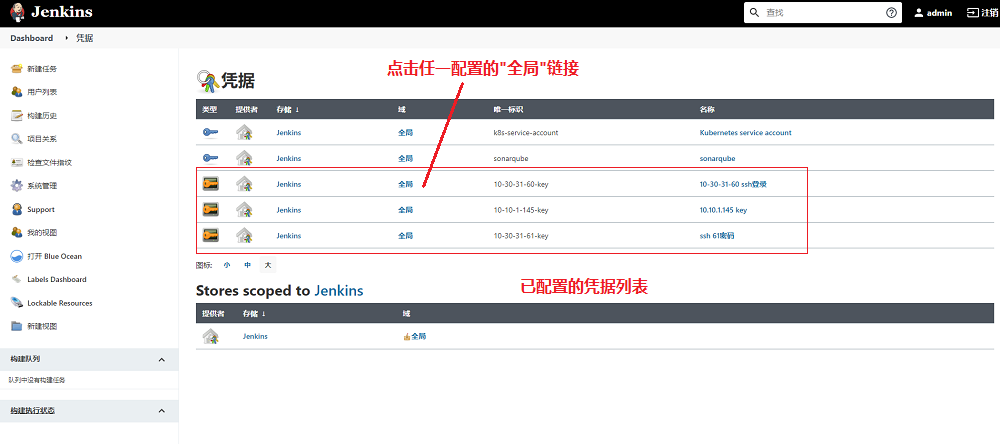
-
在出现的全局凭据列表中,点击左侧的添加凭据链接,进入添加凭据界面

-
在出现的操作界面中,将类型设置为SSH Username with private key,之后会出现类似如下界面,按照下图中的说明进行添加即可。

-
下图为基于10.30.31.24填写的相关配置,填写完毕后保存即可,至此Jenkins凭据配置完成。
注意: 为了让步骤3中显示的凭据列表更直观,更具有可读性,建议将ID和描述填写的更具有可读性,如ID的格式为IP-key,具体到本例中为10-30-31-24-key
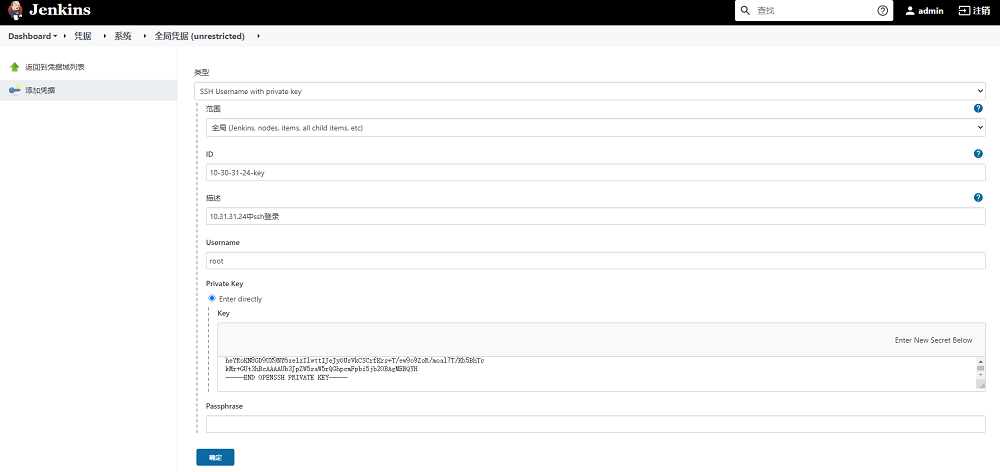
-
添加相关信息后,点击确定按钮,会在凭据列表出现我们刚添加的凭据,需要记录ID的名称,后续在Jenkins流水线中会使用到,至此Jenkins凭据配置操作完成。

流水线配置
在Jenkins中添加类似如下的代码并执行测试,若测试正常,则表示Jenkins中基于SSH的远程部署全部配置完成,操作过程全部结束!
1
2
3
4
5
|
sshagent(credentials: ['10-30-31-24-key']) {
    sh '''if [ $TARGET_IP = \'10.30.31.24\' ];then
          ssh -o StrictHostKeyChecking=no root@10.30.31.24  \'bash -s\' < cicd/ssh_deploy.sh "${REGISTRY}/${DOCKERHUB_NAMESPACE}"  ${NODE_PORT} ${PRODUCT_PHASE} "xxx-batch-storage:${BUILD_TAG}"
          fi'''
}
|
有如下几点需要注意:
-
ID值为前面在Jenkins中添加凭据时输入的值
-
StrictHostKeyChecking用于当第一次连接到主机时,自动接受新的公钥
-
if判断用于只有当KubeSphere的界面中选择的要执行的目标服务器IP是我们选中的值时才执行对应的shell脚本,KubeSphere对应的执行界面参考如下
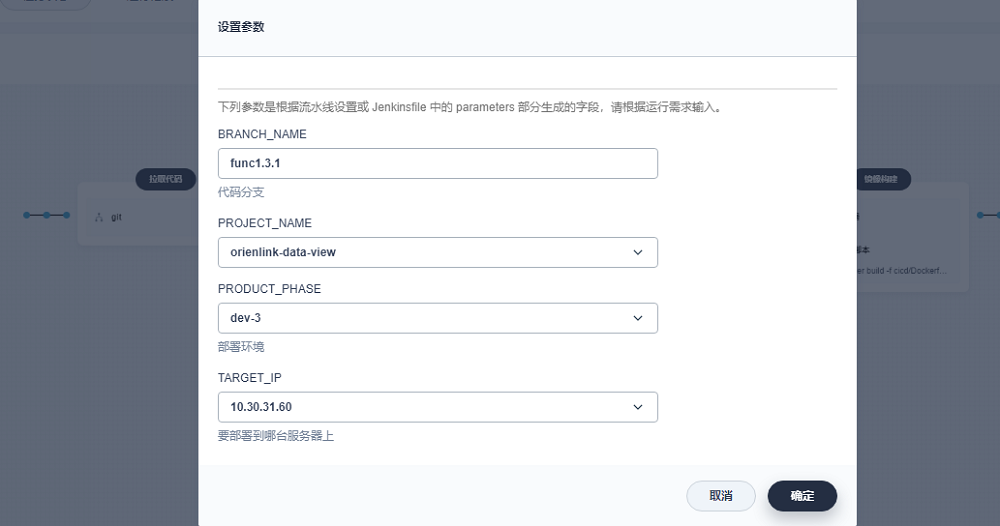
简单测试验证
基于前述的说明步骤,在KubeSphere中对10.30.31.24做个简单的测试:
-
在10.30.31.24上执行docker ps的结果如下
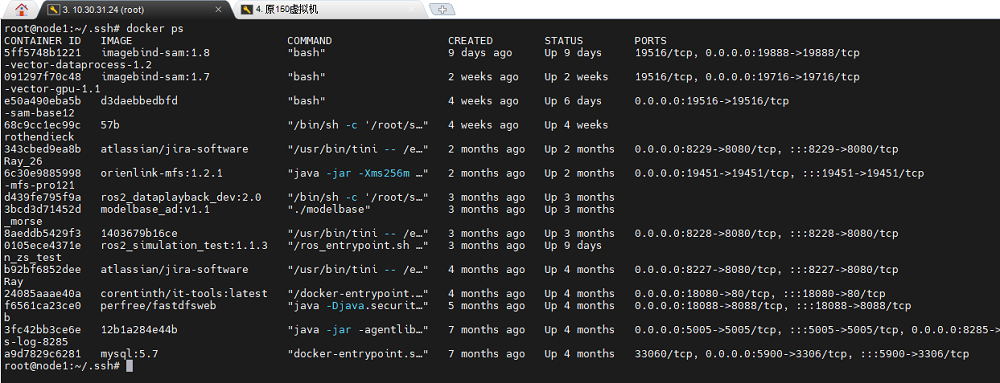
-
在KubeSphere中建立类似如下流水线
 1
 2
 3
 4
 5
 6
 7
 8
 9
10
11
12
13
14
15
16
17
18
19
20
21
22
23
24
25
26
27
28
29
30
31
32
33
34
35
36
37
38
|
pipeline {
  agent {
    node {
      label 'maven'
    }

  }
  stages {
    stage('环境设置') {
      agent none
      steps {
        container('maven') {
          sh 'TZ="Asia/Shanghai" date'
        }

      }
    }

    stage('远程执行') {
      agent none
      steps {
        sshagent(credentials: ['10-30-31-24-key']) {
          sh 'ssh -o StrictHostKeyChecking=no root@10.30.31.24  "pwd;echo $HOSTNAME;docker ps"'
        }

      }
    }

  }
  environment {
    DOCKER_CREDENTIAL_ID = 'harbor-id'
    GITHUB_CREDENTIAL_ID = 'gitlab-id'
    KUBECONFIG_CREDENTIAL_ID = 'xxx-kubeconfig'
    REGISTRY = 'xxx.xxx.local:30005'
    DOCKERHUB_NAMESPACE = 'xxx-server-library'
    GITHUB_ACCOUNT = 'kubesphere'
  }
}
|
-
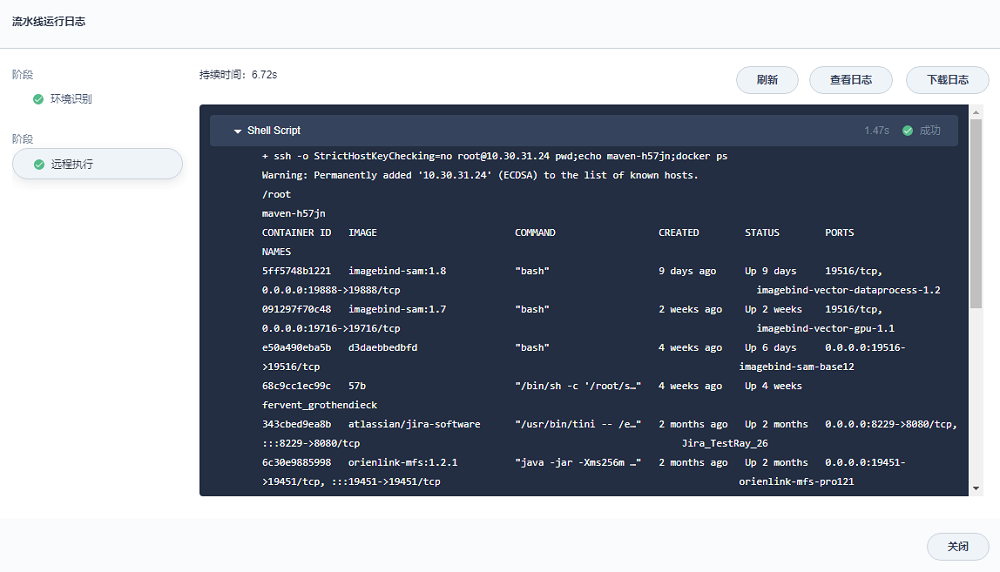
执行该流水线,在最后一个步骤的输出如下,可以看出docker ps的执行结果符合预期(至于pwd和echo $HOSTNAME输出结果有差异是由于Jenkins容器本身执行时使用的是特定的账户以及特定的路径导致的)
参考示例
远程shell脚本
注意: shell脚本在我们要通过ssh远程执行的那台执行者的电脑上,而不是位于被执行者的电脑上。
 1
 2
 3
 4
 5
 6
 7
 8
 9
10
11
12
13
14
15
16
17
18
19
20
21
22
23
24
25
26
27
28
29
30
31
32
33
34
35
36
37
38
39
40
41
42
43
44
|
#!/bin/bash

harbor_url=$1
node_port=$2
build_phase=$3
image_version=$4
clone_name=$5
module_name=${clone_name}-${build_phase}

echo "===========harbor_url: ${harbor_url}"
echo "===========node_port: ${node_port}"
echo "===========build_phase: ${build_phase}"
echo "===========image_version: ${image_version}"
echo "===========module_name: ${module_name}"


echo "开始检查并移除旧的容器"
if [[ -n "$(docker ps -f "name=${module_name}$" -f "status=running" -q )" ]]; then
  printf "停止容器: "
  docker stop $module_name
fi

# 若容器存在,则删除
if [[ -n "$(docker ps -a -f "name=${module_name}$"  -q )" ]]; then
  printf "删除容器: "
  docker rm $module_name
fi

docker_command="docker run -d -p ${node_port}:${node_port}"
docker_command="${docker_command} -e TZ=Asia/Shanghai"
docker_command="${docker_command} --name ${module_name} ${harbor_url}/${image_version}"


printf "要执行的命令为:\n${docker_command}\n"
container_id=$(eval ${docker_command})

result=$(docker inspect -f {{.State.Running}} ${container_id})
if [[ "$result" = true ]]; then
  printf "\033[32m$module_name对应的容器启动成功,容器id为${container_id:0:12}\033[0m\n"
else
  printf "\033[31m$module_name对应的容器启动失败,容器id为${container_id:0:12}!\033[0m\n"
  exit 1
fi
|
Jenkins流水线
  1
  2
  3
  4
  5
  6
  7
  8
  9
 10
 11
 12
 13
 14
 15
 16
 17
 18
 19
 20
 21
 22
 23
 24
 25
 26
 27
 28
 29
 30
 31
 32
 33
 34
 35
 36
 37
 38
 39
 40
 41
 42
 43
 44
 45
 46
 47
 48
 49
 50
 51
 52
 53
 54
 55
 56
 57
 58
 59
 60
 61
 62
 63
 64
 65
 66
 67
 68
 69
 70
 71
 72
 73
 74
 75
 76
 77
 78
 79
 80
 81
 82
 83
 84
 85
 86
 87
 88
 89
 90
 91
 92
 93
 94
 95
 96
 97
 98
 99
100
101
102
103
104
105
106
107
108
109
110
111
112
113
114
115
116
117
118
119
120
121
122
123
124
125
126
127
128
129
130
131
132
133
134
135
136
137
138
139
|
pipeline {
  agent {
    node {
      label 'maven'
    }

  }
  stages {
    stage('拉取代码') {
      agent none
      steps {
        git(credentialsId: 'gitlab-token', url: 'http://gitlab.xxx.com/xxx-backend/xxx-batch-storage.git', branch: '$BRANCH_NAME', changelog: true, poll: false)
      }
    }

    stage('识别系统环境') {
      agent none
      steps {
        container('maven') {
          script {
            def PROJECT_NAME='xxx-batch-storage'
            def BUILD_TYPE=PRODUCT_PHASE
            def NACOS_NAMESPACE=''

            env.PROJECT_NAME = PROJECT_NAME
            response = sh(script: "curl -X GET 'http://xxx.xxx.local:8858/nacos/v1/console/namespaces'", returnStdout: true)
            jsonData = readJSON text: response
            namespaces = jsonData.data
            for(nm in namespaces){
              if(BUILD_TYPE==nm.namespaceShowName){
                NACOS_NAMESPACE = nm.namespace
              }
            }

            response = sh(script: "curl -X GET 'http://xxx.xxx.local:8858/nacos/v1/cs/configs?dataId=xxx-custom-server-config.json&group=xxx-custom-config&tenant=26e0c3df-a0c7-4fe0-9b59-d04c5ac48481'", returnStdout: true)
            jsonData = readJSON text: response
            configs = jsonData.portConfig
            for(config in configs){
              project = config.project
              if(project!=PROJECT_NAME){
                continue
              }
              ports = config.ports
              for(port in ports){
                if(port.env!=BUILD_TYPE){
                  continue
                }
                env.NODE_PORT = port.server
              }
            }

            yamlFile = 'app/src/main/resources/bootstrap.yml'
            yamlData = readYaml file: yamlFile
            yamlData.server.port = env.NODE_PORT
            yamlData.spring.cloud.nacos.discovery.group = BUILD_TYPE
            yamlData.spring.cloud.nacos.discovery.namespace = NACOS_NAMESPACE
            yamlData.spring.cloud.nacos.config.namespace = NACOS_NAMESPACE
            yamlData.custom.nacos.ip = TARGET_IP

            // todo
            sh "rm $yamlFile"

            writeYaml file: yamlFile, data: yamlData
          }

        }

      }
    }

    stage('项目编译') {
      agent none
      steps {
        container('maven') {
          sh 'ls'
          sh 'mvn clean compile package -Dmaven.test.skip=true -U'
        }

      }
    }

    stage('镜像构建') {
      agent none
      steps {
        container('maven') {
          sh '''docker build -f cicd/Dockerfile \\
-t xxx-batch-storage:$BUILD_TAG  \\
--build-arg  PROJECT_VERSION=$PROJECT_VERSION \\
--build-arg  NODE_PORT=$NODE_PORT \\
--build-arg  PROJECT_VERSION=$PROJECT_VERSION \\
.'''
        }

      }
    }

    stage('镜像推送') {
      agent none
      steps {
        container('maven') {
          withCredentials([usernamePassword(credentialsId : 'harbor-account' ,passwordVariable : 'DOCKER_PWD_VAR' ,usernameVariable : 'DOCKER_USER_VAR' ,)]) {
            sh 'echo "$DOCKER_PWD_VAR" | docker login $REGISTRY -u "$DOCKER_USER_VAR" --password-stdin'
            sh '''docker tag  xxx-batch-storage:$BUILD_TAG $REGISTRY/$DOCKERHUB_NAMESPACE/xxx-batch-storage:$BUILD_TAG
docker push  $REGISTRY/$DOCKERHUB_NAMESPACE/xxx-batch-storage:$BUILD_TAG'''
          }

        }

      }
    }

    stage('ssh部署') {
      agent none
      steps {
        sshagent(credentials: ['10-30-31-60-key']) {
          sh '''if [ $TARGET_IP = \'10.30.31.60\' ];then
            ssh -o StrictHostKeyChecking=no root@10.30.31.60  \'bash -s\' < cicd/ssh_deploy.sh "${REGISTRY}/${DOCKERHUB_NAMESPACE}"  ${NODE_PORT} ${PRODUCT_PHASE} "xxx-batch-storage:${BUILD_TAG}" ${PROJECT_NAME}
            fi'''
        }

        sshagent(credentials: ['10-30-31-61-key']) {
          sh '''if [ $TARGET_IP = \'10.30.31.61\' ];then
          ssh -o StrictHostKeyChecking=no root@10.30.31.61  \'bash -s\' < cicd/ssh_deploy.sh "${REGISTRY}/${DOCKERHUB_NAMESPACE}"  ${NODE_PORT} ${PRODUCT_PHASE} "xxx-batch-storage:${BUILD_TAG}" ${PROJECT_NAME}
          fi'''
        }

      }
    }

  }
  environment {
    DOCKER_CREDENTIAL_ID = 'harbor-id'
    GITHUB_CREDENTIAL_ID = 'gitlab-id'
    KUBECONFIG_CREDENTIAL_ID = 'xxx-kubeconfig'
    REGISTRY = 'xxx.xxx.local:30005'
    DOCKERHUB_NAMESPACE = 'xxx-server-library'
    GITHUB_ACCOUNT = 'kubesphere'
  }
}
|


